Restoring a clustered Proxmox node from a backup (and something more)
Last updated: 16.09.2021
Let's explore the possibility of restoring a previously backed-up Proxmox VE 7.0 node residing in a cluster. I'll assume you already have the essential files backed up from the Proxmox node itself and have a need to rebuild the whole Proxmox node from ground up.
Following this post will hopefully give you a base system working in the cluster as if it never left at all. Please also note that this will not restore your Proxmox subscription since that's something I'm not able to test to include in this guide (I'm using the free version).
The files and directories we are going to need from the backups are:
/etc/corosync/*            (the whole directory [this is mandatory])
/root/.ssh/id_rsa          (to prevent change of the host identity)
/root/.ssh/id_rsa.pub      (to prevent change of the host identity)
/etc/network/interfaces    (you probably do not need this)
In case you are wondering what to back up in the first place, just go with the whole /etc directory along with the /root directory. This won't give you backups of virtual machines, containers or local file systems, but that would not be an issue since those can be either backed up by different methods or quite easily rebuilt on reinstalling Proxmox VE 7. Please still back these up somehow (for the time being I just copy these to a USB stick manually).
Install a fresh Proxmox VE to the node
First things first. Make sure you have made a complete clean install of Proxmox VE 7 to the node in question. In my case I have already installed Proxmox and am to configure the storage on the node next.
Basic node storage configuration matching my Cluster
Let's now configure the storage to match what the Datacenter storage configuration expects (see the web ui on another node perhaps?). If you already have a working storage configuration feel free to jump to the next section.
My current datacenter storage configuration is pretty basic with defaults local (Directory) and local-lvm (LVM-Thin, at pool data as seen when editing the storage on web ui) and a single NFS share as Nas1. These are shown in the image below.
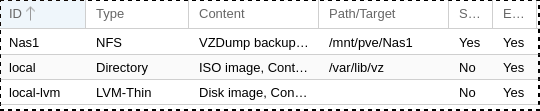
By running commands pvs, vgs and lvs on the target node we see that it already has proper physical volume (nvme0n1p3), volume group (pve) and logical volumes (data, root and swap) configured:
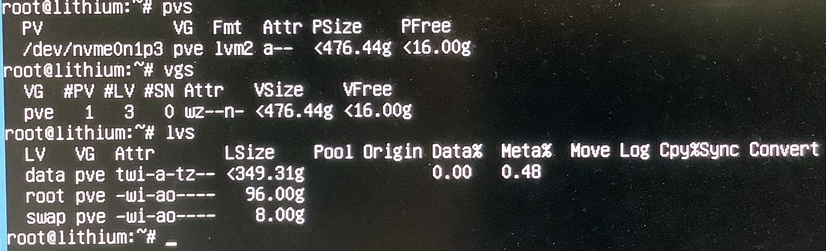
(The picture quality is what it is, and the display is dirty. It shouldn't matter.)
Resizing pve-root and pve-data to my liking
This part must be done in a live Linux environment (I'd recommend GRML) since the operations cannot be done on disks that are currently in use (so no running these from Proxmox installation itself).
One thing I'd still like to do is to shrink the root volume and expand the data volume to make as much space available to guests as possible. To put it simple, this can be achieved by executing the following commands:
lvm vgchange -a y                          (Activate the LVM)
e2fsck -f /dev/mapper/pve-root             (Check the root file system)
e2fsck -f /dev/mapper/pve-data             (Check the data file system)
resize2fs -f /dev/mapper/pve-root 40G      (Shrink the root FS to 40 GB)
lvm lvreduce -L40G /dev/mapper/pve-root    (Reduce the Logical Volume to 40 GB)
lvm lvextend -l +100%FREE /dev/mapper/pve-data    (Extend the data LV)
resize2fs /dev/mapper/pve-data             (Expand the data FS)
In case of a brand new installation without a file system on pve-data running both e2fsck and resize2fs on pve-data will result in errors. These should not matter since the file system for pve-data gets created later.
Now reboot back to the actual Proxmox installation and check sizes of the logical volumes with lvs.
Configuring the NAS storage
The NAS storage configuration will actually be restored automatically from the cluster so there is no need to do anything to it right now. How nice and simple.
Restoring necessary configs
Required configs
For the sake of simplicity I've backed up the config directories and files to a USB stick before reinstalling Proxmox. I've already mounted the stick to /mnt/backups.
Let's first restore the root rsa key pair to get our previous identity back:
cp /mnt/backups/root/.ssh/id* /root/.ssh/After that let's move on to the actual Proxmox configs. There are only one directory and one file needed to be copied:
cp -r /mnt/backups/etc/corosync/ /etc/
cp /mnt/backups/etc/corosync/corosync.conf /etc/pve/
Please note that we deliberately copy the corosync.conf to /etc/pve/ as Proxmox expects that.
The basic restore is now done and you might unmount the backup stick and restart services corosync and pve-cluster (instructions at the end). Since my environment is a bit different from "the standard" one, I still need to restore some networking configurations before going on with rebooting the node.
Restoring networking since my environment is a bit customised
From the same back up USB stick I also want to restore the interfaces config. This will be different from yours (quite probably you don't even need to restore this), but as a reference I'll include it here as well.
In my case it's enough to just copy the interfaces file from the USB stick:
cp /mnt/backups/etc/network/interfaces /etc/network/And for you interested in what kind of configurations I have there, here you go:
auto lo
iface lo inet loopback

iface eno1 inet manual

auto vmbr0
iface vmbr0 inet manual
        bridge-ports eno1
        bridge-stp off
        bridge-fd 0
        bridge-vlan-aware yes
        bridge-vids 2-4094

auto vmbr0.10
iface vmbr0.10 inet static
        address 192.168.10.61/24
        gateway 192.168.10.1
As you can see the only interface in that node is made VLAN-aware and the virtual management interface is placed on VLAN 10.
Now that these are in place let's unmount the backup stick and restart networking.
Restart corosync and pve-cluster services
The last thing to do is to restart the corosync and pve-cluster services:
systemctl restart corosync pve-clusterThe node should pop right back to the existing cluster and provision configurations automatically. In case you get the _tls_process_servercertificate: certificate verify failed error when accessing the web interface, then the certificates need refreshing. That's easily done by running pvecm updatecerts on the node after it has rejoined the cluster, and rebooting the system.
Next steps
In my case, where I have two Proxmox nodes in a cluster, I also had to perform some additional steps which I'll go through here quickly.
My cluster consists of nodes named:
- Lithium: lithium.local.lan / 192.168.10.61 (the target machine in this guide)
- Sodium: sodium.local.lan / 192.168.10.62
The additional steps performed:
- Lithium: I disabled the pve-enterprise repository and added the no-subscription one instead. This can easily be done in the web gui at `node->Updates->Repositories'.
- Lithium: Ran
/usr/bin/ssh -e none -o 'HostKeyAlias=sodium' root@192.168.10.62 /bin/trueto add node Sodium back to ssh_known_hosts of Lithium. - Sodium: Ran
/usr/bin/ssh -e none -o 'HostKeyAlias=lithium' root@192.168.10.61 /bin/trueto add node Lithium back to ssh_known_hosts of Sodium.
Everything should now be in order and you may start restoring those VMs and containers back to the node.